Editing Sub Accounts and Their Permissions
Print
Modified on: Fri, Jul 20, 2018 at 10:18 AM
Editing Accounts
If an account needs its permissions changed or if details such as names or addresses need to be updated, changes can be made directly to the existing account by following these steps:
|
|
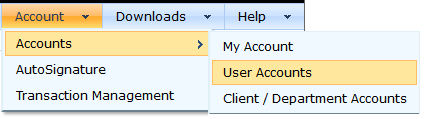
1) Hover over the Account tab on the toolbar. This will open a drop-down menu.
| 
|
2) In the drop-down menu, navigate from Accounts to User Accounts and select either the User Accounts or the Client / Department Accounts tab.
|
3) Click the Edit link next to the name of the account that needs updating.
| 
|
4) The next page has a list of permissions that can be enabled or disabled for the individual account.
5) Make the necessary changes, then click the Submit button in the bottom right corner of the page to save the changes or Cancel to leave the account with its original settings.
| 
|
Disabling of Processing Capabilities
While all accounts can have the ability to process mail and generate address labels, in some administrative accounts, this functionality may be unwanted. To turn off the ability to process mail, in a specific account, follow these steps:
|
|
1) Hover over the Account tab in the toolbar. This will open a drop-down menu.
2) In the drop-down menu, go from Accounts to either User Accounts or Client / Department Accounts, depending on the type of account needing deactivation.
|  |
3) Find the account to be deactivated and click Edit.
|  |
4) Under the heading Advanced Features: EZ Address, several options are listed. Uncheck the User (or Client) can generate Address Labels box.
|  |
5) Save the changes by selecting the Submit button at the bottom of the screen.
|
6) The account to which the changes were made will no longer be able to create mail pieces.
|
Deactivating Accounts
| Once created, accounts cannot be deleted. However, if an employee has left or ceased to work with the service, any account can be deactivated. The status of a deactivated account becomes False and it can no longer be accessed. |
|
1) Hover over the Account tab in the toolbar. This will open a drop-down menu.
|  |
2) In the drop-down menu, navigate from Accounts to either User Accounts or Client / Department Accounts, depending on the category of the account needing deactivation.
|
3) Find the account to be deactivated and click Edit.
|  |
4) Under the heading Advanced Features: Account, several options are listed. Uncheck the User is inactive and can access the website box.
|  |
5) Save the changes by selecting the Submit button at the bottom of the screen.
|
6) The account to which the changes were made will no longer be able to log into the website.
|
Did you find it helpful?
Yes
No
Send feedback Sorry we couldn't be helpful. Help us improve this article with your feedback.